|
Vmax
starter Clutch
Project
chronology:
....2004Oct...Page started, left in draft form.
....2006Jan....iowaz Vmax pages were deleted from the web host.
....2010Mar....The old starter clutch page/project was
uploaded in draft form for a Vmax contact that needed info.
Remember: All data & links are old & likely void.
....A sequence of pictures of the starter clutch
removal and PCW Racing's 'fix' is located in this photo album (I used both PCW
Racing's puller & his 'fix).
http://public.fotki.com/iowaz/iowaz-cycles/vmax-starter-clutch/
....Do Google, YouTube,
Facebook searches for new information.
Iowaz Index Page
Iowaz Photo
Hosting Site
Vmax T-boost kit

Damaged starter clutch.
Worn threads on fasteners, worn/cracked plate, worn rollers, weak
springs.
General Overview:
How does the Starter Clutch work??
....The Starter Clutch is
the mechanism by which the Starter Motor engages and turns over the
Engine for starting.
....The Starter Gear is connected to the shaft of
the electric Starter Motor, which through a series of Idler Gears, spins
the large diameter Starter Clutch Gear that lies behind the flywheel.
....The spinning Starter Clutch Gear's center engages and lodges three
rollers/dogs in the Starter Clutch Assembly that is physically connected
to the Flywheel, which in turn is connected to the engine Crank Shaft.
....Through this mechanism the engine is turned over and is started.
The
'health' of the Electrical System and Battery, Starter Motor and Starter Clutch are
important to quick and reliable starting of the Engine.
Where is the Starter Clutch??
....The
Starter Clutch Gear and Assembly lies behind the Flywheel which is behind
the Alternator Cover on the left side of the Vmax.
....The Flywheel must
be removed to get at the Starter Clutch Assembly and Gear. The
removal of the Flywheel from the tapered end of the Crankshaft is often
very, very difficult without the correct Gear Puller and tools.

What has to mechanically be done
to get at the Starter Clutch
Assembly and Gear??
1. The
process starts with removing the left Foot Peg and then the Shifting
Lever.


From this point the sequence of
pictures on the photo site will be helpful to visualize the process.
http://public.fotki.com/iowaz/iowaz-cycles/vmax-starter-clutch/
Next steps
2. Next the Middle Gear Cover is removed (black circular cover
behind the foot peg).
....This will allow for the wires coming from the
Stator of the Alternator to be released from their clips behind the Middle
Gear Cover, so that the Alternator Cover can be set on a box/stand near the rear
tire and out of the way, thus no further removal of the Stator and
Alternator Cover wires are necessary (as described in the manual).

3. The Alternator cover, with its internally attached Stator
Coils, is removed and set off to the rear on a box.
....Info on
how the electrical production and charging system works---the internal
ring of the Flywheel is magnetized, the copper Stator coils sit inside
the Flywheel center and the spinning, the magnetized Flywheel sets up
electron flow down the copper wires toward the electrical system of the
bike, thus this arrangement is the Alternator supplying current to run the
bike and keep the battery charged.
4. At this time it is possible to slip the Idler Gears and
their Shafts off/out to get them out of the way when the Flywheel releases.
....Note: Remember the sequence in the photo album will help
visualize the process?
http://public.fotki.com/iowaz/iowaz-cycles/vmax-starter-clutch/
5. The center bolt holding the Flywheel to the Crank is
removed.
....Suggestion: this bolt can take a lot of force to
break loose. Use a good six point 1/2 inch drive socket (not
twelve point socket, as they often slip on the fastener head, causing
damage), and the longest/strongest breaker bar you can get. If you
do not know what a breaker bar is, surf a tool site such as Sears, or
browse a good tool store. Breaker bars are very necessary in any
tool chest.
6. To remove the flywheel, it is best to then use a gear puller adapted to the removal
of the Vmax Flywheel.
....I would suggest using one such as supplied
by PCW Racing, or build one as shown on Thomas's site (links below).
You can also attempt to use a good puller such as supplied by Sears or SnapOn, but will need to then acquire long high strength bolts, as the
stock ones will likely stretch and make the job difficult to impossible.
....There have been many suggestions for the use of heat and
tapping/hammering the flywheel/crank area to assist removal with stock
pullers. I chose to use PCW's puller, with great success, as the
flywheel just gently released. However, it is best to have a good
compressor and air impact wrench to complete the removal.
....The Vmax Flywheel has historically been
very, very difficult to remove without proper equipment and know how.
Even many cycle shops are stumped by the process. The issues will
be addressed a bit further down this page. The puller will attach
in the three threaded holes in the center of the Flywheel.
7. After the Flywheel is off the bike, the three bolts
holding the Starter Clutch Assembly to the Flywheel can be removed.
....The Starter Gear and Starter
Clutch Assembly can than be inspected and replaced.
....The Starter Clutch
Assembly is bolted to the back of the Flywheel by three bolts. which can
be seen showing from the front (outside) of the flywheel before removal.
8. A new Starter Clutch Gear and Starter Clutch Assembly can be installed or another option such as PCW Racing's fix may be
selected.
....Typically the Starter Clutch on a Vmax will become
dysfunctional around 20k +/-5k miles. The three bolts in some
cases may release much earlier, causing noise and clanking in this area
while the bike is running, thus this is the weak link in the starting
system of the Vmax.
....The usual issue is the wearing of
the surface between the rollers/dogs of the starter clutch assembly and
the inner ring of the Starter Clutch Gear, thus there is no 'solid'
connection between the Starter Motor and Engine, so starting is
hesitates, clicks or ceases. The starter clutch assembly can even
lock up on the crank so the starter motor cannot move at all.
9. There may little to no
warning the Starter Clutch is nearing total failure, or one my hear
excessive noise around the Alternator Cover area, or sense hesitation in
the starting process as the dogs fail to grasp the Starter Clutch Gear.
Bottom line, if you run a Vmax very many miles, you are going to have to
repair your Starter Clutch. Apparently the Starter Motor runs for
more mileage and will need to be rebuilt or replaced less often, perhaps
in the 40-80k range.
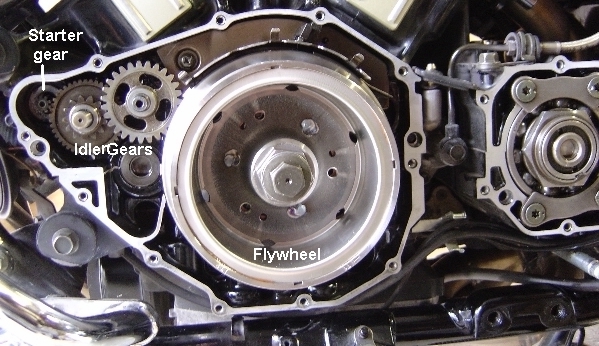
Above:
Shows what
one will see when the covers are pulled off. The Starter Clutch
Assembly is behind the flywheel. Note the large hex bolt head in the
middle attached the flywheel to the engine crank.
Below: After the
Starter Clutch Assembly was unbolted from the back of the Flywheel, the
Assembly was slipped back on the Crank to slow the relationship between
all of the 'starting' gears' and the Starter Clutch Assembly. The
spinning Starter Clutch Gear engages and lodges the three roller/dogs of
the Starter Clutch Assembly to spin the flywheel/crank/engine for
starting. The main wear causing Starter Clutch failure is the
interface/connection/surface between the inner ring of the Starter Clutch
Gear and the three rollers/dogs of the Starter Clutch Assembly.

Thoughts:
...Beware that the three bolts holding the Starter Clutch Assembly to the
Flywheel can loosen, possibly allowing metal debris to release in area of
the spinning Flywheel and oil supply. Excessive noise under the
Alternator Cover may be an indicator of loose fasteners.
...The shell of the Starter Clutch Assembly can move/spin over the top of
the three attachment bolts stopping the Assembly to function to start the
engine.
...The Flywheel removal is best done with a gear puller designed for the
specific job. Shops may not have this type of puller and my end up
using hear and/or banging on the crank/flywheel.
...Expect to service a Vmax Starter Clutch every 20+/- miles.
More specific procedures,
explanations, information follow below.
Also Thomas Powell's page has good info and pics:
http://imageevent.com/tppjr
http://imageevent.com/tppjr/modifications/starterclutchfix
|
Microfiche and Parts Sources
(links old, untested)
http://www.yamaha-motor.com/products/categories/2/mcy/yamaha_motorcycles.aspx
http://www.knmotorcycles.com/ K&N Cycles will give VMOA members
a nice discount.
http://www.rivamotorsports.com/
http://216.37.204.203/Yamaha_OEM/YamahaMC.asp
http://www.bikebandit.com/partsbandit/Default.asp|
www.partsfish.com
www.pcwracing.net
Has a gear puller that works, plus has a 'solution' to the starter clutch issue.
I bought his gear puller with worked perfectly. I sent my flywheel and
start clutch assembly to pcw racing for his fix, which is basically permanent.
Fiche from BikeBandit
2004 prices
Crankcase cover fiche from
BikeBandit


Stator fiche from BikeBandit


Starter Motor fiche from
BikeBandit


Starter Clutch Assembly from
BikeBandit


Same operation as outlined above, 'by
the book,'
or extracted from various manuals and resources with
personal ideas.
Vmax Starter Clutch Servicing
Steps in Order
Source information from Clymer's,
Haynes', Factory Service Manuals and assorted saved Vmax list posts.
Tool suggestions:
Gear puller, made to fit the job.
Air impact socket, shallow, six point, 9/16 inch, for gear puller bolt.
Air impact gun, 1/2 inch, with 120-130 lb of air pressure from the compressor.
Hex sockets, 4mm, 5mm, 6mm, 8mm
Open end wrench, 32mm; or large adjustable spanner, to hold crankshaft while
removing crank nut.
Sockets, metric set to include, 10mm, 12mm, 19mm
Breaker bar, large!, to break the crank nut.
Assorted rachet handles and extensions.
Slip ring pliers.
Oil drain pan, rags, paper towels.
Parts:
Starter gear, Yamaha #26H15517-00
Starter clutch bolts, three, Yamaha #91317-08-0814
Starter clutch kit, Yamaha #11H-15580-00
Alternator cover gasket, Yamaha #3JP-15451-01
Gear cover gasket, Yamaha #3JP-15461-01
Materials:
Red Locktite, possible.
Brake cleaner, to degrease surfaces, possible.
Gasket sealer, possible.
Replacement engine oil.
Hints:
...Read/review the procedures several times before starting.
...Have a digital camera and take numerous pictures before starting the next step.
...Have some small containers, pop flats, zip locks and labeling materials
available to keep parts separate and organized.
...Have the correct tools for the 'job.' Use a large floor tray to hold
tools a
...Some torque values have been listed, and a good torque wrench should be used
for major components such as the crank bolt. However, for some less
critical fasteners such as cover or seat fasteners, a 'feel' for the correct
snugness may be just as good or even better since torque values for some
fasteners may be to much.
...Do not bite off more than one can chew! A shop repair may be your best
option.
Preparation for Gearcase and Alternator Cover Removal:
...It is not necessary to drain the oil. There will be some oil loss when the gear case cover is
removed, so this may be a good time to drain and change the engine oil. Or
the old oil can be topped off after the starter clutch operation is completed.
Rider Seat Removal:
...Unsnap the seat backrest. The same as for filling up with fuel.
...Hint...Slide the 'backrest' forward which will expose the front/rider seat screws.
...Remove the seat screws on both sides.
...Pull the seat rearward to disengage the seat's front tap from its bracket.
...Lift back and up, and remove the seat.
Rider Seat Installation:
...Slide the forward seat tab into its bracket, but sure it is in place.
...Install the seat screws and firmly tighten.
...Slide the backrest back into position before pushing it down into locking
position.
Side Cover:
...Remove the two two hex screws. There will be washers behind the
screw heads.
...Carefully pull the top out a little while lifting upward to release the cover
from the frame tab at the bottom.
Side Cover Installation:
..Fit the cover into the frame tab.
...Install the cover screws/washers. Torque to 7N-m or 62ft-lb.
Suggestions/Hints:
...Disconnect the negative battery terminal and insulate from touching anything.
...At this point take a complete series of digital pictures around the left side of
the Vmax to be used as reference when re-installing the stator and pickup coil
connectors, the wiring ties, the wiring, peg, brake pedal, covers replacement.
...Disconnect the three-pin stator connector and the pickup coil connector from
their mates on the wiring harness.
...Open the clamp and release the alternator wires from the frame.
...Open the cable ties that that bundle the wires together.
Left-side Rider Footpeg Removal:
...Remove the two mounting bolts at the bottom of the footpeg bracket.
12mm socket.
...Lower the footpeg from the frame>
Footpeg Installation, is the reversal. Torque to 10N-m or 89ft-lb.
Shift Lever Removal:
...Take note of the dot on the shift rod that aligns with the crack of the shift
lever.
...Loosen the clamp bolt on the shift lever. 10mm.
...Pull the shift lever from the shift shaft. The shift lever must be
reinstalled in the same position so take note of the index mark on the shift
shaft that will align with the gap in the shift lever.
...Remove the snap ring and its washer from the shift pedal post.
...Pull the shift pedal off its post. Pull the shift lever from the
splines of the shift shaft.
Shift Lever Installation:
...Is the reversal of the removal.
...Lubricate the pivot post on the shifter bracket with waterproof lithium
grease.
...Place the shift lever on the shift shaft with the gap in the lever aligned
with the mark/dot on the shift shaft.
...Torque for the shift lever clamp bolt is 10N-m or 89 ft-lb.
...Be sure the snap ring is seated into its groove.
Middle Gearcase Cover Removal:
...Loosen the middle gearcase cover bolts in a star/crisscross pattern.
5mm hex. When removing and installing the bolts to any type of cover use a
star pattern. Be ready for oil leaking from the cover when it loosens.
...Watch for the copper crush washer beneath the bottom bolt of the middle
gearcase cover. A new crush washer should be ordered and installed at this
point during re-assembly.
...Remove the two forward gearcase cover bolts that also hold the shift lever
bracket and remove the bracket out of the way.
...Remove the rest of the gearcase cover bolts and pull/release the middle
gearcase cover. Watch for a moderate amount of oil releasing as the cover
comes off. Watch for two steel dowel pins on the lower sides of the
cover/case.
...Remove the gearcase gasket from its location. Carefully clean all
gasket residue from both the cover and case surfaces, and wife clean for
re-installation of the cover.
Middle Gearcase Cover
Installation:
...Install a new middle gearcase cover gasket.
...Place the two dowel pins into their position in the crankcase of the engine.
...Hand start/tighten the gearcase cover bolts. Again in a star pattern.
...Be sure to place a new copper washer behind the head of the correct bolt at the
bottom of the cover.
...Evenly/gradually tighten/torque to 10N-m or 89ft-lb.
Alternator Cover Removal:
...Open connector holding the
alternator wires from the frame.
...Clip the cable tires that bundle the alternator wires together. Take
digitals or make a drawing so that relocation of the wires and other steps can
be reviewed for re-assembly.
...Loosen then remove the alternator
cover bolts in a cross fashion.
...Remove the alternator cover. Be careful to retrieve the two steel dowel
locator pins between the alternator cover and engine case.
...Remove the alternator cover gasket,
which my have stayed on the cover or may be still on the engine case. A
new gasket should have been ordered and ready to install upon re-assembly.
Be sure both the crankcase and the alternator cover are clean of old gasket
material, oil, debris for re-installation.
Alternator Cover Installation is
just a reversal of the removal:
The two dowel pin locators should be in place on the crankcase.
Install a new alternator gasket.
Hand install the alternator cover bolts and finger tighten in a crisscross
fashion. Snug the bolts down with a socket set in the same manner, then
use a torque wrench to torque the bolts to 10N-m or 89ft-lb.
Install the shift lever so the slot in the lever aligns with the index mark on
the shift shaft. Tighten the shift lever clamp bolt to 10N-m or 89ft-lb.
Rotor Bolt Removal:
...Observe rotor bolt through the middle of the flywheel and the five sided
'head' on the flywheel center for holding it in place when the rotor bolt is
broken loose.
...Using a 32mm (1 1/4 inch) open end wrench, Yamaha sheave holder (#YS-01880), or a large
adjustable spanner (Crescent wrench), hold the flywheel. A second person
may be needed for this operation. An 1 1/4 inch open end wrench works very
well for this operation. If case guards are installed the wrench handle
can be blocked on the guard.
...Using a six-point (not twelve point) 19mm socket on a long/big breaker bar or
rachet,
break loose and remove the rotor bolt and its washer. If this bolt is
difficult to break loose, and if the situation, the larger/longer the breaker
bar, plus a 1/2 socket and bar, may be the solution.
...There is an oil wire inserted into the back/center of the rotor bolt, so find
it. The oil wire may come out with the bolt or remain in the crankshaft.
Find the oil wire and get it back into position in the center of the rotor bolt
for re-installation.
The Flywheel Puller, a major issue:
...Puller options:
Use flywheel removal ideas from the various Vmax forums/lists.
Yamaha number YU-33270 and puller adapter number YM033282.
Make your own by Thomas Powell
http://imageevent.com/tppjr/tools/modifiedflywheelpuller
Buy one from PCW Racing Inc.
http://www.pcwracing.net/featured.htm

Note: I bought/used the PCW Racing flywheel puller,
and sent the flywheel/stater.clutch assembly to PCW Racing for his permanent
'fix.'
(I assume this service is no longer operational, but have not checked.)
(Pics of the puller and returned flywheel package are in the photo sequence.)
http://public.fotki.com/iowaz/iowaz-cycles/vmax-starter-clutch/
...A functional flywheel puller is
mandatory as the flywheel is on a long tapered bore/shaft so the contact surface
between flywheel and shaft produces a highly bonded surface, therefore it can be
very difficult to break the flywheel loose from the crankshaft.
....Also the
flywheel puller bolts have to be very long to reach from the puller plate down
to the flywheel puller insert threads. These long bolts will stretch under
the high loads placed on them making if often impossible or nearly impossible to
break the flywheel loose. Often long bolts stretch, so when the flywheel
does release the bolts contract and can shoot the flywheel across the room, so
be careful if not using a puller with long bolts and not one with studs as shown
on the above link.
REMOVE THE IDLE GEARS, FLYWHEEL
5. Remove the flywheel bolt.
Check for clog of
the oil passage in the flywheel bolt and clean if necessary.
Remove the plain
washer.
Remove the pin.
6. Remove the flywheel using
an appropriate puller. When removing the flywheel, do not
allow the oil baffle plate to touch the projections on the flywheel.
7. Remove the woodruff key on
the crank.
Remove the
Starter Clutch Gear.
Flywheel Removal
I chose to buy the puller sold by PCW Racing, which worked great as described
below.
...Thread the three 8mm socket head set screws supplied with the puller into the
three threaded puller holes on the flywheel using a 4mm hex head wrench.
Snug down until they are firm/tight.
...Screw the three chrome moly stands/spacers supplied onto the 8mm set screws
and snug down with your hand.
...Bolt the puller to the stands with 3/8 16 socket head machine screws
supplied. Be sure the hardened washer of the two is against the puller
head. Tighten these bolts down tight with an 8mm allen wrench, making sure
the puller is centered on the flywheel.
...Use a 1/2 inch air impact wrench with a 9/16 inch six point shallow impact
socket to drive the puller. Air pressure of 130lbs is desirable. Hit
the air/trigger on the air impact wrench, and if the flywheel does not release
and start sliding off, hit the air again. If the flywheel still does not
release, retighten/firm up the fasteners on the gear puller. Followed by
lightly/carefully tapping the gear puller bolt to send a slight shock wave down
the crank which may help break the bond between the crank and flywheel.
But be very carefully not to 'pound' on the puller/crank setup, just a light
couple of taps. Then again continue with hitting the air again. The
flywheel should release with any significant problems using a modified gear
puller and air impact wrench.
...Remove the flywheel from the crankshaft, but be careful it does not touch the
oil deflector which hangs over the area. The flywheel may need to be
rotated to miss the oil deflector.
...Remove the Woodruff key (crescent shaped piece of metal) which is likely
still in the grove down the crank shaft. If not, it is stuck in the
flywheel. Place the Woodruff key in a safe place as it is easily lost.
Another option?...If you do not have a compressor and air impact wrench
you can
try a long breaker bar and socket. You can also try a gear puller with
just the normal long bolts to reach the flywheel puller threads but the history
of that set up is that the bolts stretch under the great force applied and often
break if not high strength bolts. High strength bolts often stretch enough
that when/if the flywheel releases from the crank the puller and flywheel are
shot with a rubber band effect across the room, so be careful, have eye/hand
protection, and have a soft stop set up for the flywheel, such as rugs/blankets.
The flywheel is a $500 items so you do not want to ding it up.
Inspection of Parts:
...Wipe the parts clean or clean with a solvent and dry with compressed air.
...Carefully check the flywheel for cracks/breaks/chips. Replace if
damaged. A flywheel break-up at high speeds can throw fragments into the
engine.
...Inspect the crankshaft and threads of the flywheel bolt.
...Take a good look at the starter and idler gears and their shafts.
...Look for worn/broken teeth on the starter wheel gear and for worn patches on
the smooth bearing surface of the starter wheel gear created by the rollers of
the starter clutch. Inspect the rollers in the starter clutch.
Generally it is best to replace the entire starter clutch assembly and
starter wheel gear.
Starter Clutch Disassembly:
...Place the flywheel face (outside) down.
...Rotate the starter wheel gear counterclockwise to remove it from the
flywheel. The gear sits over the starter clutch housing.
...Press the spring cups against the spring and remove their rollers, then
remove the cups and springs from the starter clutch housing.
Installing new
Rollers/Springs/Cups:
...Be sure the large/thin washer is in place in the starter wheel bore as
the rollers ride over the outer edge of this washer.
...Fit a new cup on a new spring end set spring end first in place in the
starter clutch housing. The roller will ride on the cup end.
...Compress the spring by pressing on the cup end and insert a roller into the
housing, releasing the cup/spring.
Flywheel Installation (by the
book):
...Clean all the oil from the crank taper.
...Install the starter wheel/gear into the flywheel.
...Replace the Woodruff key into the crankshaft keyway.
...Align the flywheel keyway slot with the Woodruff key. Slide the
flywheel on to the crankshaft
...The starter wheel gear needs to engage the starter idle gear.
...Place the oil wire into the flywheel bolt.
...Start he flywheel bolt/washer by hand into the end of the crankshaft.
...Hold the flywheel with the 32mm or 1 1/14in or crescent wrench and torque the
flywheel bolt to 130N-m or 96ft-lb.
...Be sure the starter idler gear and idler shaft are installed correctly.
Pre 2004
Vmax List Posts Regarding the Vmax
Starter Clutch
First, some personal
thoughts:
...The posts are to give one an idea of some of the past
discussions regarding the Vmax starter clutch. There were valid ideas
being shared, but also some procedures tried/used that should be avoided, so
read the past posts with that insight in mind.
...Although not being any sort of an accomplished mechanic, I need to share some
personal opinions at this point in time before reviewing past posts.
...It should be noted about the concern mentioned regarding newer Vmax's
possibly having a issue of no or incorrect locktite being used on the three
bolts holding the starter clutch assembly to the flywheel. These bolts
apparently come loose letting the starter clutch wobble around and possibly
release parts as the flywheel spins at high speeds. Release of parts in
this area would/could cause some serious damage. The starter clutch
assembly could be inspected by opening up the case, observing and feeling the
starter clutch assembly while on the installed flywheel. The flywheel
would not have to be removed for this inspection.
...Using heat on the flywheel to cause it to expand and release some of its
pressure on the crank should be avoided, IMO. Turning the crank bolt out a
couple of turns and leaving it in place so that the flywheel does not 'fly' off
should be avoided, IMO. The end of the crank is indented to fit the end of
the gear puller, so if the bolt is in place, the gear puller would be resting on
the crank bolt putting very excessive pressure on the treads in the crank.
Pounding/hammering on any part of the crank, flywheel, puller should be avoided,
IMO. A very light tap might be used on the puller bolt, but that is all.
...IMO, it is well worth the cost or effort to make or buy a gear puller with studs
instead of using long bolts which stretch/break. Also, the contact of point of the
puller to the crank shaft should be flat or machined flat to mate. The
puller center bolt end should not be pointed! It is also worth
finding a compressor and air impact wrench to use with the correct gear puller.
With that said, some of the following posts are left intact as they give
examples of using 'manual' methods of removing the flywheel that some people may
need to try due to equipment availability.
...A general heading has been added to each posts series to give an overview of
the post's topic.
PAST POSTS
My starter grinds. How can I fix it?
Note: This project is not for mechanical beginners. I am not responsible for
damage you may cause to your motorcycle by attempting to follow this without
sufficient experience. You will probably have to replace the starter clutch. It is bolted to the
back of the flywheel. It's not that technically difficult, but the flywheel can
be a bear to get off of the crankshaft.
Link to remainder of info with pics:
http://home.nc.rr.com/vmaxfaq/StarterClutch.htm
For those of us who have delt with
the clunk/crunch/whir of a failing
starter - John Ganey offers his very own solution -
www.pcwracing.net
Flywheel
Retaining Bolt
...My
starter clutch is
hitting and missing. Trying to
remove generator flywheel thing to get to it, but having no luck!
Any one got any tips. Is the retaining bolt in the end of the
crank right or left hand thread?
Bolt on end of crank is right hand. Use at
least grade 8 bolts on puller
or wasting time. Also only loosen bolt on end of crank a couple of
turns, don't remove, so it doesn't fly across the room when it comes
loose.
Don "Old Man" Smith
The flywheel has a "sculpted hexagonal
bolt like" section for you to hold on
while loosening the bolt. DO NOT try turning that part as if was a bolt!!!
Believe me it won't turn (don't ask me how I figure that one out :-)
Use a harmonic puller or a steering wheel puller with machine grade (black
looking) bolts. Also Make sure that the bolts (3 of them) are at least 4 1/2
inches long. It is also a good idea to loose but not remove completely the
bolt securing the flywheel in place. The flywheel/puller will fly across the
room!!!! Once you move it half millimeter it will just pop out.
Apparent Issues
on Newer Vmax's with the Bolts Holding the Starter Clutch Assembly to the
Flywheel!!!
...Has anyone in the group had any experience
removing and repairing
starters. The unit on my '97 spins but doesn't engage gears every
time.
If you sometimes start it is probably the
infamous STARTER CLUTCH problem
NOT THE STARTER.
My '97 with 10K miles is starting
to show signs of starter clutch problems
too.
A horrendous grinding noise sometimes when starting.
You will need to pull the LEFT cover and remove the fly wheel.
The starter clutch is under the fly wheel. I think about $150-200 for
the rebuild kit.
Get a service manual...... and I think you will need to do more looking about
the starter clutch in the archives...there is a complete procedure on
how to do it some where here...maybe someone will point it out.
It seems the factory was lacking with the
newer bikes. The bolts that hold
the clutch in are suppose to be cemented in with locktight and then the ends
are peened so the bolts will not come out. Most of the new bikes that have
had problems have been peened but no lock tight. It was good that they were
peened at least with mine it was all that kept them from falling out and
bouncing around the engine. Most of the bikes that have trouble seem to be
newer.
Flywheel will
not come off
...Well I attempted to inspect my starter
clutch, but could not remove the
fly wheel even after buying a puller and heating around the fly wheel
bore. After inspecting the clutch bolts, the movement of clutch and the
condition of the gear teeth as best I could, I gave up and put
everything back together. I only put dope around the cover where the
gasket had separated thinking the local dealer was going to have to tear
it all down again anyway. Just for the heck of it I tried to start it
one more time and behold, the bike fired up! In fact the clutch hasn't
slipped in five days!!!......What's up with that!!!
Another thing that I noticed was the presence of motor oil inside the
fly wheel cover along with the white grease. Is this normal?
Gear
Puller Bolts
Can someone tell me the size of the three
bolts used to attach
the puller to the flywheel? I know they should be at least grade 8 and can get an
appropriate length but haven't got anything on the shaft/thread size.
Okay,
They are M8x 1.25 same as the
pinch bolts in the
triple clamps among other things. The new problem is where to get them in grade 8.
The 2 places
I just went don't have any grade8 metrics. any suggestions?
---
http://www.mcmaster.com/ enter "2919" in find box
They have Class 12.9 metric bolts, but come in a box of 100.
---
You can obtain Grade 8 bolts in "inch"
sizes .. they are rated for a
minimum tensile strength of 150,000 psi.
Believe it or not you can also get a Grade 9 now ... 180,000 psi tensile
strength, 20% higher than the standard for Grade 8 cap screws.
However Metric strength ratings are different than those for
"inch" sizes.
Metric Class 12.9 (the highest metric strength class) exceeds the strength
of Grade 8. Minimum tensile strength is 174,000 psi.
Metric Class 10.9 is comparable to Grade 8. Minimum tensile strength is
150,000 psi.
So, it is safe to say you will not be finding any Grade 8 metric
bolts.
Go get what you want at McMaster Carr .. the stuff shows up like the very
next day for peanuts ...
http://www.mcmaster.com/
You can run yourself ragged trying to find a decent variety of metric in
local shelf stock (in the US anyhow).
Starting
Problems
I own a 1995 V Max, Stock except for
TBoost, which I just installed this year. The problem I am having is with my
starting system. I hit the start button, and it sounds like the starter and
gears are just spinning. Sometimes for a brief second it will catch, and almost
start, and it did start once. I thought at first bad starter motor, so I
replaced it with a new one, and had the same result. After a little searching
here, I now think it is the starter clutch. I removed the side case, and
removed the flywheel. As far as I can tell, everything looks good. Anything I
can do to get it to fire up, or just replace the clutch also. I purchased it
brand new, and it has 2500 miles on it. Any help appreciated thanks.
Very Important
Information Why the Flywheel Bolt Needs Totally Removed
Before Pulling the Flywheel!!!!!!
That was one ugly picture
of the loose bolts. I was much luckier. My bolts were
only about 1 turn loose and no damage to anything. I only drove about
20 kms after the noise started.
It is referred the puller bolts as being grade 8 but it has been referred to
replace the 3 starter clutch bolts with grade 8's. Hoping that
reusing the original bolts is alright because they are thoroughly red
lockite'd in place although the flywheel is not re-torqued so if
necessary can get it off without borrowing another puller.
Discussions on this
repair have noted / warned that the flywheel will "fly" off the arbor
when it finally releases. One response indicated using an impact gun
for additional pressure and most have recommended leaving the flywheel
bolt only a couple of turns unscrewed so the flywheel cannot "fly" off.
I did not have an impact gun, so I was tightening the puller as much as
possible with my 1/2" drive socket (and using a spanner as shown in the
manual) and then hammering quite heavily on the puller center bolt.
After my second unsuccessful attempt, I tried to put the socket back on
the puller center bolt, which I couldn't because the hammer had
mushroomed the head (file, file). This didn't seem right (duh!).
Then I remembered something about tapered arbors from decades old
machine shop. Tighten a LITTLE, then tap (not hammer), repeat as
often as necessary. So instead of torquing as much as possible and then
hammering, I did a little at a time and it came off with seemingly much
less torque on the puller center bolt and the flywheel was easily
retained from flying off by just placing my hand in front of it while I
tapped.
I suspect that initial over-torquing of the puller center bolt is
contributing to the excessive force then required to release the
flywheel from the arbor.
Not only did my procedure seem to eliminate the need to leave the bolt
in place to prevent the flywheel flying off but the flywheel center bolt
is not designed to be left in place regardless of which pulling method
you use.
Once this bolt is removed there is a large taper section at the mouth of
the bolt hole which is designed for the tapered slider that fits into
the end of the puller center bolt. Leaving the flywheel center bolt in
place causes whatever torque being applied to the puller to be applied
to the threads of the center bolt. This can't be a good thing.
Some Have Tried
Heat When Removing the Flywheel, but Something to Avoid IMO
Real character builder, isn't it...
Heat is the trick. I wasted 3 pullers myself. I only used 1 propane torch
but, Propane won't generate enough heat quick enough. What I did was heat,
turn, heat, turn. Don't force the puller. Took a couple days because I had
to keep running back to sears for a new puller... 3 different sears stores..
When the flywheel finally comes off, it will POP and fly a few feet. Watch
you shin bone..
Also on the puller, make sure to replace the bolts with at least grade 8 or
better. Stock puller bolts are soft and will stretch and bend. It is a bitch
of a job but you can do it..
You Can See the
Flywheel Removal Problem Kept Coming Up in the Discussion
Do you know some trick for remove the flywheel??
---
you need to use bolts that are at least grade 8 or better.
Bolts that come with some pullers are grade 5 or less and stretch.
---
The center bolt stays but keep it loose with a little more than a 1/8
gap.. The center bolt is what your going to pull against and it will
keep the flywheel from flying off...
Put some tension on the puller.. Now take a flat ended bar or similar,
hit around the HEX part of the fly
wheel where it's like round and flat.. I did this in 3 spots and the
thing popped off like nothing.. Now if the pulled bolts stretch, get
the matching 8 grade bolts..
---
Connect an air impact wrench that is being fed
300 (120+) psi and use the
flywheell puller. This amount of psi can be found at a local tire
replacement company. It can come off
fairly simply or like mine it can be a mother.....
Use the grade 8 or better bolts. I had to use the next
grade up.. Torque down on them and make sure they are all evenly
applying pressure on the puller. Torque the main bolt on until you
can't anymore (by hand) and then tap on the end of the bolt. I had to
hit it fairly hard, but some say tap lightly. Then torque the bolt with
the air wrench til it seemingly stops and tap some more.
Torqueing/tapping then tightening is the procedure. If your lucky it
will come off and all will be right with the world. As long as your
still torqueing then your doing something so don't freak out when you
realize that you have been at it for a half hour or an hour.
Is the Starter
Clutch Really the Problem?
You may have answered this and I missed it,
but now that the stator cover is
off, have you examined the starter clutch to be sure it is the problem?
Can you move the starter gear in and out on the crankshaft, or wobble it, or
rotate it in both directions? Or did you find loose screws in the bottom of
the stator housing? You don't want to take things apart and fix them when
they aren't broken.
---
The starter clutch can still be cracked and
not detected from feeling
things. Once the fly wheel is off, the baffle plate (starter clutch assembly
case) screws need to be
checked too. That is what came loose on mine the 1st time.. Caused it
to bind and crack
---
I should add that the 2nd time my starter
clutch went bad was from
the starter clutch bolts loosening..
Cycle
Shops May Not be Able to Handle the Flywheel Removal
My mechanic is having problems removing my flywheel to get at a damaged starter
clutch gear. He has broken two flywheel pullers already. I don't know whether
they are Vmax specific flywheel pullers or not.
My service manual says to use the Flywheel Puller (YU-33270) with the puller
adapter (YM-33282) is this an absolute requirement and what does the adapter do?
Also, does anyone have any specific advice for removal of a stubborn flywheel?
What is
Going On With My Starter?
Starter been grinding too? It's the starter
clutch. Makes a clunking
noise at idle, sounds just like a rod.
http://home.nc.rr.com/vmaxfaq/StarterClutch.htm
Good Grief!!!!!
A Must Read Example of Taking the Problem to the Un-informed.
This example also shows that some pullers have a 'pointed' contact
point with the crank shaft, which IMO is a no-no. The 'face' of the puller
needs to be flat or machined flat to 'fit' the correct size/fit of the end of
the crank.
Please excuse my motorcycle ignorgance. I
have had a rough sound when
starting recently. Today this sound evolved into no start at all. When I
try to start the starter doesn't seem like it is engaging at all, just a whine.
On a car this would be an easy diagnosis and fix. The starter is bad.
Go get one and replace it. A couple of screws, a couple of wires and,
Wella, no more problem.
Maybe it's just my lack of confidence that makes me feel everything about
the bike is so much more complicated but then again when you hear related
terms that you don't know about, it makes you feel as if there is something
else you should know. For instance, I'm sorry but I don't know what a
stator is. I know it's electrical and is something like a coil. I also
don't know what a starter clutch is. What I think I need is a starter
motor. Any info would be helpful, such as, whether this is my problem,
where to get one online, how much to expect to pay, and hints in
replacement.
---
The car starter you talk about in cars has a
Bendix, which is some sort of gear driven by the motor shaft and included in the
starter, that's why you call it an easy fix, since you just have to remove the
whole unit and fix it or replace it.
In our case it is a totally different system, (unluckily for you), specially
when you mention that the starter whines but does not engage, that means that
the motor is working, but not the starter clutch, which is not part of the
starter motor, but fixed to the flywheel on the crankshaft. This element is on
the left-hand side of the motor, and to get to it, you have to remove the big
cover, Remove the flywheel and inspect the clutch and replace it/fix it. As you
have mentioned, since you are not much into bike mechanics, you better take it
to the dealer or better still, find a close by guy in this group that can lend
you a hand, since pulling the flywheel is no joke.
MOST IMPORTANT, the starter clutch is fixed/attached to the flywheel and
the first/one thing that happens is that the fixing screws get loose, then they can
come out and start damaging other engine parts, so I sincerely recommend that
you don't ride or start the bike any longer, till you get the starter clutch
attended; after screws are loose, metal to metal scraping is more than likely,
clutch rollers & springs can break and you end up with an engine full of nasty
pieces moving about......
---
I took your guys' advice and took this job to
the shop. The problem is I
live about 45 miles from a real bike shop, and they have a huge wait for
service. A new bike shop opened very close to me. Not an authorized dealer
mind you but a bike shop.
He could get to work right away and I'd be back up in no time, and besides I
just got my Metzelers and needed to get them mounted anyway.
Well all praise to the V-Max group and the gurus who inform the ignorant
like myself, for the prophecy came true. The flywheel is a b&^%* to get
off. I know you guys are going to know exactly what I'm talking about so I
don't feel awkward in describing it. This guy has a (cheap looking) puller
that has what I would say resembles three fingers and a thumb. It looks to
be cast. I've used a gear puller before for pulleys, and it works on the
same idea but instead of claws grabbing the outside with a center driving
bolt for leverage, it has screws that go through the fingers and thumb and
screw into the flywheel to grab it, and of course the same type center bolt
for leverage.
With this set up he has only accomplished stripping the hardened screws
of the puller. It hasn't stripped the flywheel, yet. He has put heavy psi
on it (the center bolt of the puller has completely flattened its point),
rapped on it with a hammer while under pressure (with protection for the
wheel), and applied heat via torch. Still this flywheel won't come off. He
says that this is the tool all the shops use but when I was talking to
someone else about it he said there is a better puller that grabs hold of
the shaft or something. What do you guys know about these pullers and other
techniques to remove the flywheel? I've told three different shops and
countless others about you Gods of the Max who know all. I know you can
help.
Something else we noticed; of the three screws that hold the starter
clutch, one is tight, one is backed out some, and one is slightly backed
out. The slightly backed out one is loose enough to move by finger but
hasn't backed out much because someone evidently had this problem before and
tapped the end of the bolt enough to mushroom the end. For some reason they
just did that to one of the three bolts. Now it will have to be ground to
be removed.
I was waiting to remove the flywheel/starter clutch to assess the damage
and replace as necessary, but now that this job is such a b&^%*, I'm going
to replace all of the starter clutch including new bolts. My 'mechanic'
also suggested changing the brushes on the starter motor as preventative
maintenance from ever having to remove this damned flywheel again. Any
other suggestions about preventative maintenance in this area would be very
much appreciated as well.
---
Pull the crank out and put it in a press,
or you could try tapping the flywheel in the direction it turns , this seams to
help
last one I did came off easy after it moved a little I think they get spun
against the key and lock on! ( just a thought)
also when it pops off you might lose the magnets and then you will need a new
flywheel :(
---
Thanks a million guys. Great to have you
there, especially in a time of
need. As I mentioned the 'mechanic' was rapping on the side of the flywheel
with a hammer with a rag in between for protection (still left marks). This
didn't get the impact through down to the shaft. I got a direct tip from a
list member, and later he ('mechanic') got the same one,
to hit instead the center bolt of the puller, seems like a simple little
change, but one that could easily not be done. As you know this puller
looks cheap and you wouldn't think right away to beat it with the hammer,
just doesn't seem as natural as hitting the object that you want to come
loose. But now that I know, it seems so obvious. Hitting the flywheel,
especially necessarily padded, just absorbs the blow, but when you hit that
center bolt with all of the pressure on it after cranking it with an impact
transfers all of the impact through the shaft and center of the flywheel and
creates a shockwave. Two blows to the right spot and, Wow! The puller and
flywheel flew across the room and into the wall. No damage. It's back
together and running. I just need to get my tires mounted and I'll be back
on the road later today. Sorry I got a little dramatic "summer's slipping
away". Two work weeks and a weekend in the middle of summer causes frantic
withdrawal in a bad way. Thanks for the warning not to ride (push start).
The head of one of the bolts that hold the starter clutch to the flywheel
was slightly rubbed down. A condition which surely would have caused
problems had I taken the bike on one good ride after it had backed out.
No Loctite
Again, PCWracing's Puller
The starter clutch is most likely your
problem. The 3 bolts holding it
in place often come loose. Serious damage results if max is run and
they come completely out. You need to pull the flywheel to check/repair
it.
The service manual shows loctite on these bolts. Mine had none.
---
I hear the PCW version of the puller does
great. Others have used a rubber mallet and hit the center bolt to loosen
things up, but I don't recommend that. Anyway, PCW says that theirs will remove
all Vmax flywheels on the 1st try.
http://www.pcwracing.net/featured.htm
Questions,
Questions
When I started my bike a few weeks ago (after
sitting for about 2
months) it cranked and fired after a few times. When starting it over
this past weekend it would crank and then starter would spin but kind of
grind. Then hitting the starter it would catch then do the same thing a few
times. My question is where do I pull the cover off to check to see if
bolts are loose? Also should I order a new gasket for the said cover?
And
what else should I look at to see why it might be acting up? It is a 94
and should be a 4 pole starter (How can I confirm?), I have a pc 680
battery and it is up to spec......it showed no sign of being weak at all.
plus just a short while ago I made sure system was indeed charging at idle
and battery when off was fine. Any thoughts and is it hard?
A couple
of years ago I had someone else "fix" it and all was fine till late
---
Mine is doing the same thing. I did this job
on my other engine, before
the swap. It is a pain. You have to pull the entire stator cover, and you
will need a new gasket. Then, pull the flywheel. That is the real pain. Guys
have broken pullers trying to get them off. You'll need a good puller and
probably a torch, to heat the center of the flywheel while using the puller.
Don't stand directly in front of the flywheel, because when it pops, it may
go flying. I dread tearing into this job again.
---
The alternator cover on the left side needs to
be pulled and yet a new cover gasket should be used. Be careful of the stator
when removing the cover. There are also two dowels, make sure they stay in the
crankcase.
The flywheel must be removed to get to the starter clutch, hopefully that's
what's bad....new starter motors are expensive.
---
Isn't there something to look at before
pulling the flywheel? Then
what am I looking for anyway? Loose bolts? If and when pulling the
flywheel what usually needs to be replaced?
---
You can look at the starter idler gears and
the starter shaft. To get to the clutch, flywheel must be removed. I hear PCW's flywheel puller is guaranteed to get the flywheel off in the first try.
It's probably your starter clutch, mine did the same thing. Sounded nasty, mine
was caused by worn clutch bearings.
Crank Bolt and Flywheel Puller Bolts?
Can anyone tell me if the flywheel bolt is left-hand
thread? Also, what size
bolts do I need to screw into the flywheel for the
puller?
---
No, it's right handed thread. The standard
bolts that
came with my puller kit fit the three holes perfectly
so you should be ok if you bought a kit. They might be
10's or 12's, not sure and my kit is not here to
check.
One more thing: I wouldn't heat up the flywheel with a
torch. There are magnets in there and I doubt that
turning them red would do them much good. The best way
to get the flywheel off is to use an impact gun on the
center bolt of the puller. Just be sure to have
something soft underneath it because it probably will
flop off.
---
Well, I bought a Craftsman harmonic balancer
puller and some grade 8.8 M8 x
1.25 x 90mm bolts (no one in my rural area had anything harder). I found
that the flat adapter that came with the puller set perfectly fit inside the
center hole of the flywheel, after removing the bolt. I used a 1/2" drive
air impact wrench to tighten the puller, then tapped on the hex-shaped area
of the flywheel, and on the end of the puller's center bolt. After tapping,
I'd tighten the puller again with the impact wrench. I did this routine
about 4 times and the flywheel popped right off. There was no doubt as to
the problem! All three bolts on the starter clutch were finger loose, and
the side of the thin metal piece that covers the clutch was actually
ruptured. Tomorrow I'm off to the local dealer to see if they have one. If
not, I'll probably be ordering from Scott Powersports, with the VMOA
discount.
What Loctite
Should Be Used on the Three Starter Clutch Assembly to Flywheel Bolts?
When loctiting
the bolts for the starter clutch, what is the minimum time before running the bike? and is blue
loctite the one to
use?
---
Use red, not blue loctite.
---
Used to be only one red loctite. You want stuff that sets up after
heated and doesn't come out. Used it on exhaust manfold bolts, once set,
it took 1/2'' drive impact to remove 3/8'' stud.
----
I've had some bad experiances with the
permanant red
locktit.
I switched to something called 1360.
My currant tube is labeled suzuki so I dont know if
the number crosses with locktit.
Its called med strenght,high heat.
Had very good luck with it.
My 2c...
---
Don't use blue loctite on the starter clutch
bolts. I did and they came
loose again. Did again with red, no problem.
DO NOT DO THIS
(The flywheel bolt needs to be totally removed so that the end of the crank
meshed with the flat main bolt end of the puller.)
When removing the
flywheel, loosen the bolt that holds it on, don't take it out. Back it
off maybe 2 turns, then it won't bite you.
DO NOT HAMMER
ON THE CRANK OR FLYWHEEL
I would be very careful hitting the center
bolt. Remember that the flywheel
is attached to the crank and the shock will go through the crank too. I
would think the side load on the bearings would not be too good.
Your best bet is to get a quality puller and replace the bolts with at least
grade10 if it does not come with them (usually the ones that come with the
puller are not long enough). I got a Sears Craftsman just because it is
guaranteed but I think I pushed it pretty much to it's limit. Heat is pretty
much a necessity. The faster you can apply it AFTER you have max torque on
the puller the better. The object is to heat the flywheel fast enough so
that it heats and expands and the heat does not have time to transfer to the
crank.
As many have said before, beware when she POPS loose and I do mean POP!! It
will fly across the room.
Replace All
Parts
Replace all the starter clutch parts. I am
going thru this right now. My
screws were tight, but the clutch slipped. In addition, the roller pins in the clutch wear
little bevels in to the idler gear where they contact it. I did the
research, you can benefit. K&N cycles in Oklahoma (on the VMOA vendor list)
absolutely had the lowest price and will ship directly to your home. Cost
for clutch with all parts, 3 new screws, and idler gear, and....shipping is
about $110. No one can beat that price. Contact them and give them your
VMOA number for the discount!
It never fails, whenever you spend and ridiculous amount of time
polishing, detailing and improving the little things, something major
goes wrong. Today, my starter would not engage and it produced a rapid
clicking sound. I dared not try to start it again fearing that I'm
grinding gears. So, here's the good news. A quick search of the mail
archives
http://www.mail-archive.com/v-max@sayegh.org/ returned a
message from Thomas Powell who had the same experience.
I took my side cover off and to my relief, the gears looked fine. But,
sure enough, the three bolts that hold the starter clutch against the
flywheel had come loose. When I manually moved the larger starter gear,
I can clearly see the bolts moving from within the flywheel. So, I went
out and got a harmonic balancer remover for $15 and attempted to removed
the flywheel in order to "loctite" and tighten the three bolts.
Amazingly, I ended up stripping the center bolt on the harmonic balancer
remover and that damned flywheel didn't move a single nanometer.
Tomorrow, I'll get some longer bolts to attach to the flywheel and
thread the center bolt past the stripped section. I soaked the section
between the flywheel and the crankshaft with liquid wrench and will let
it sit overnight. One thing I didn't do was hit the center bolt with a
hammer to set up some vibration. I'll do this tomorrow once I get
longer bolts to attach to the flywheel. Once I get that flywheel off,
the rest should be easy.
Something I had mentioned before and will again. When
removing the
flywheel, loosen the bolt that holds it on, don't take it out. Back it
off maybe 2 turns, then it won't bite you.
I would be very careful hitting the center bolt. Remember that
the flywheel
is attached to the crank and the shock will go through the crank too. I
would think the side load on the bearings would not be too good.
Your best bet is to get a quality puller and replace the bolts with at least
grade10 if it does not come with them (usually the ones that come with the
puller are not long enough). I got a Sears Craftsman just because it is
guaranteed but I think I pushed it pretty much to it's limit. Heat is pretty
much a necessity. The faster you can apply it AFTER you have max torque on
the puller the better. The object is to heat the flywheel fast enough so
that it heats and expands and the heat does not have time to transfer to the
crank.
As many have said before, beware when she POPS loose and I do mean POP!! It
will fly across the room.
My starter will spin disengaged when the bike is cold. I have
to play with it until will finally engage completely to get it to turn over.
But if it is warm or at operating temperature, the starter works fine.
I'm going to pull the fly wheel tonight and check those three bolts to see if
they are loose or anything else that might be a culprit.
Replace all the starter clutch parts. I am going thru this right
now. My
screws were tight, but the clutch slipped. Take a look at the pics and you
will see why it slipped. In addition, the roller pins in the clutch wear
little bevels in to the idler gear where they contact it. I did the
research, you can benefit. K&N cycles in Oklahoma (on the VMOA vendor list)
absolutely had the lowest price and will ship directly to your home. Cost
for clutch with all parts, 3 new screws, and idler gear, and....shipping is
about $105.00. No one can beat that price. Contact them and give them your
VMOA number for the discount! In the parts pic, #6 is the idler gear, #7
the entire clutch assy, and #11 the screws
It's been awhile since I did mine
but, let me try to explain. Do you have tools?
You will need a wheel puller, impact wrench (I didn't use one but
would be nice), sedylene<spelling) torch, sockets, torque wrench,
allen keys?
Got the repair manual? You can down load that if you need one.
The fly wheel will need to be removed. This is a bitch without the
proper tools. The 8 grade bolts Don speaks of are the upgrade for the
wheel puller you will end up buying if you don't have one. Anything
less will bend. Just match the bolts with the grade 8 bolts.
Pull side cover(s) on the shift side of bike. You will need to remove
the shifter, foot rest, etc. to do this. There it is, the FLYWHEEL..
Get the puller set up on there and start to crank it tight. While
doing this you want to use the torch to heat the flywheel center.
Heat, crank, heat, crank. It will be a good idea to stay clear of the
front of the flywheel. Like Don say's, you will shit when it POPS. It
will fly through the air when it goes. It is heavy enough to hurt
(don't let this scare you) you if your in front of it.
Now the rest is cake once the flywheel is off. The gear pulls off and
there is the starter clutch. Did anyone get the stuff off Paul's
site? There was a nice page showing the part and what to look for.
Anyway, sometimes it is only a bad case of loose bolts. Sometimes not
and the SC is cracked. Inspect all the bolts on the baffle plate
above too. Mine were loose there also.
I went through 3 wheel pullers before I finally got my flywheel off.
I used a propane torch. It wasn't hot enough.
It's not as tough as it sounds. Good luck. You can pop the clutch in
2nd gear to get you started. I parked on hills allot till I fixed
mine.
Well don't use a sledge hammer :)) Been pulling gears,
flywheels,
bearings, balancers, etc for many years with the hammer method with no
problem . It is a common practice in the professional shops . Much safer
and quicker than heat . I've pulled my max flywheel off twice and at
least another half of dozen others using the method . It is a simple
physics law . An object at rest tends to remain at rest .
Last week one of the locals, that is also a mechanic, brought over to
me a flywheel and starter clutch unit to look at . I asked him if he had
any problems getting the flywheel off and all he said was " No I just
wacked the puller a couple of times and off it came" .
Use whatever method you are comfortable with .
I use a brass mallet for jobs like this, there is no problem
for
crankshaft at all. All you are doing is taking up the thrust clearance,
it can't go anywhere else.
Bolt on end of crank is right hand. Use at least grade 8
bolts on puller
or wasting time. Also only loosen bolt on end of crank a couple of
turns, don't remove, so it doesn't fly across the room when it comes
loose.
The flywheel has a "sculpted hexagonal bolt like" section
for you to hold on
while loosening the bolt. DO NOT try turning that part as if was a bolt!!!
Believe me it won't turn (don't ask me how I figure that one out :-) )
Use a harmonic puller or a steering wheel puller with machine grade (black
looking) bolts. Also Make sure that the bolts (3 of them) are at least 4 1/2
inches long. It is also a good idea to loose but not remove completely the
bolt securing the flywheel in place. That thingy will fly across the
room!!!! Once you move it half millimeter it will just pop out.
I use a brass mallet for jobs like this, there is no problem for
crankshaft at all. All you are doing is taking up the thrust clearance,
it can't go anywhere else.
Bolt on end of crank is right hand. Use at least grade 8 bolts on puller
or wasting time. Also only loosen bolt on end of crank a couple of
turns, don't remove, so it doesn't fly across the room when it comes
loose.
The flywheel has a "sculpted hexagonal bolt like" section for you to hold on
while loosening the bolt. DO NOT try turning that part as if was a bolt!!!
Believe me it won't turn (don't ask me how I figure that one out :-) )
Use a harmonic puller or a steering wheel puller with machine grade (black
looking) bolts. Also Make sure that the bolts (3 of them) are at least 4 1/2
inches long. It is also a good idea to loose but not remove completely the
bolt securing the flywheel in place. That thingy will fly across the
room!!!! Once you move it half millimeter it will just pop out.
If you sometimes start it is probably the infamous STARTER CLUTCH problem
NOT THE STARTER.
My '97 with 10K miles is starting to show signs of starter clutch problems
too.
A horrendous grinding noise sometimes when starting.
You will need to pull the LEFT cover and remove the fly wheel.
The starter clutch is under the fly wheel. I think about $150-200 for
the rebuild kit.
Get a service manual...... and I think you will need to do more looking about
the starter clutch in the archives...there is a complete procedure on
how to do it some where here...maybe someone will point it out.
It seems the factory was lacking with the newer bikes.
The bolts that hold
the clutch in are suppose to be cemented in with locktight and then the ends
are peened so the bolts will not come out. Most of the new bikes that have
had problems have been peened but no lock tight. It was good that they
were
peened at least with mine it was all that kept them
from falling out and
bouncing around the engine. Most of the bikes that have trouble seem to be
newer.
Well I attempted to inspect my starter clutch, but could not remove the
fly wheel even after buying a puller and heating around the fly wheel
bore. After inspecting the clutch bolts, the movement of clutch and the
condition of the gear teeth as best I could, I gave up and put
everything back together. I only put dope around the cover where the
gasket had separated thinking the local dealer was going to have to tear
it all down again anyway. Just for the heck of it I tried to start it
one more time and behold, the bike fired up! In fact the clutch hasn't
slipped in five days!!!......What's up with that!!!
Another thing that I noticed was the presence of motor oil inside the
fly wheel cover along with the white grease. Is this normal?
I did not have an impact gun, so I was tightening the puller as
much as
possible with my 1/2" drive socket (and using a spanner as shown in the
manual) and then hammering quite heavily on the puller center bolt.
After my second unsuccessful attempt, I tried to put the socket back on
the puller center bolt, which I couldn't because the hammer had
mushroomed the head (file, file). This didn't seem right (duh!).
Then I remembered something about tapered arbors from decades old
machine shop. Tighten a LITTLE, then tap (not TAP or hammer), repeat as
often as necessary. So instead of torquing as much as possible and then
hammering, I did a little at a time and it came off with seemingly much
less torque on the puller center bolt and the flywheel was easily
retained from flying off by just placing my hand in front of it while I
tapped.
I suspect that initial overtorquing of the puller center bolt is
contributing to the excessive force then required to release the
flywheel from the arbor.
Not only did my procedure seem to eliminate the need to leave the bolt
in place to prevent the flywheel flying off but the flywheel center bolt
is not designed to be left in place regardless of which pulling method
you use.
Once this bolt is removed there is a large taper section at the mouth of
the bolt hole which is designed for the tapered slider that fits into
the end of the puller center bolt. Leaving the flywheel center bolt in
place causes whatever torque being applied to the puller to be applied
to the threads of the center bolt. This can't be a good thing.
Real character builder, isn't it...
Heat is the trick. I wasted 3 pullers myself. I only used 1 propane torch
but, Propane won't generate enough heat quick enough. What I did was heat,
turn, heat, turn. Don't force the puller. Took a couple days because I had
to keep running back to sears for a new puller... 3 different sears stores..
When the flywheel finally comes off, it will POP and fly a few feet. Watch
you shin bone..
Also on the puller, make sure to replace the bolts with at least grade 8 or
better. Stock puller bolts are soft and will stretch and bend. It is a bitch
of a job but you can do it..
Connect an air impact wrench that is being fed 300 psi and use
the
flywheell puller. This amount of psi can be found at a local tire
replacement company like Discount Tire in the States. It can come off
fairly simply or like mine it can be a mother.....
Use the grade 8 or better bolts like Don says, I had to use the next
grade up.. Torque down on them and make sure they are all evenly
applying pressure on the puller. Torque the main bolt on until you
can't anymore (by hand) and then tap on the end of the bolt. I had to
hit it fairly hard, but some say tap lightly. Then torque the bolt with
the air wrench til it seemingly stops and tap some more.
Torqueing/tapping then tightening is the procedure. If your lucky it
will come off and all will be right with the world. As long as your
still torqueing then your doing something so don't freak out when you
realize that you have been at it for a half hour or an hour.
The starter clutch can still be cracked and not detected from
feeling
things. Once the fly wheel is off, the baffle plate screws need to be
checked too. That is what came loose on mine the 1st time.. Caused it
to bind and crack
End of a variety of past
list posts regarding starter clutch issues/ideas.
Microfiche and Parts Sources: (links old, not
checked, most likely void)
http://www.yamaha-motor.com/products/categories/2/mcy/yamaha_motorcycles.aspx
http://www.knmotorcycles.com/
http://www.rivamotorsports.com/
http://216.37.204.203/Yamaha_OEM/YamahaMC.asp
http://www.bikebandit.com/partsbandit/Default.asp|
www.partsfish.com
www.pcwracing.net Has a gear puller
that works, plus has a 'solution' to the starter clutch issue, which I utilized.
Site/page chonology:
None of the
iowaz pages contain Vmax info/ideas after 2006.
...1996+...Most of the Zmax pages were originally uploaded to Angelfire.com
from about 1996>2002, at a time when digital photo size was small and web page
space limited. There were very few, if any, helpful Vmax pages at the
time, so the major objective of the pages was to share with other non-mechanics
various processes learned the hard way.
...2006...About 2006, a web host with unlimited storage and a better interface
available and future web work was uploaded to iowaz.com. Cycle pages were
not transfers but instead left on the free version of Angelfire. About this time more people with
much better mechanical knowledge and experience were building better pages.
....2007...By 2007, there were too many complaints and opinions coming in on some
of the Vmax pages, and especially the orange oring project that originally
started with the Zmax material, so the Vmax pages were taken offline
about this time.
...2023...Due to a requests for information a few of the old Zmax pages might be transformed
as-is from the old Angelfire material to the iowaz host. None of the
pages contain new information after the 2006 timeframe. Zmax has been gifted to another rider.
Vmax turned into
Zmax: With fork brace, head set
"fixed", frame brace, manual fan switch, Galfer green brake pads, braided
stainless steel brake and clutch lines, Speedbleeders, National Cycle Plexistar
II shield, case guards, factory sissy bar and tail piece, a few other accessory
odds and ends. Hindle 4-1 Stainless Steel Headers with a 16" Carbon Fiber
Stealth Can, K & N air filter, four 1/2" holes drilled in the air box "Y" (later
taped over), carbs left stock but needles shimmed 0.025" with five coils tied
off on the slide springs, center stand removed, Work's shocks with dual rate
springs and adjustable rider system, Works dual rate fork springs, reinstalled
Bridgestone V rated Excedra tires, T-Boost installed. PCW racing starter
clutch fix, orange-oring issue reseaches/fixed. The dyno run stock was 107+,
with mods 111+ and the curve exactly follows the stock run, no hesitations, no
weak spots. The net weight loss from center stand and stock shocks removal was
about 50lbs, which produced another net of about 6 hp, for a total gain of 10
useful hp on a massively improved handling package. Vmax was good stock, but
the frame mods, loss of weight and efficient exhaust Zmax produced the
third best bike I had owned, behind the more modern 2001FZ1 amd 2002R6. Yamaha
should have completed the basic mods needed on their stock Vmax. Zmax is
running GREAT!! bz/2006
In 2023, Iowaz' Zmax was gifted to
another rider.
 Iowaz Index Page
Iowaz Photo Hosting Site


iowaz1@gmail.com or
iowaz@hotmail.com
Reproduction of this site
or it's contents requires consent.

Barry Zbornik
Hannibal, MO
